

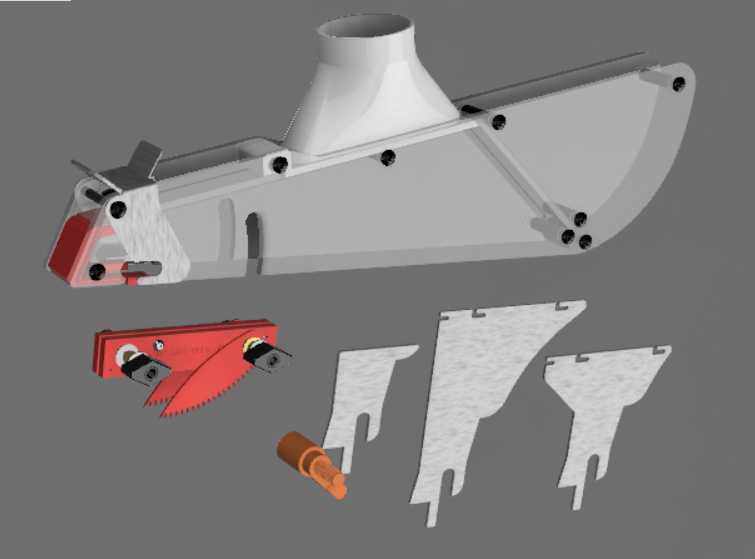
In the Package
When you receive your Shark Guard, verify that nothing was damaged in shipping. Here is a current list of parts that should be included with a standard Bridgewood, Delta, Grizzly, Powermatic and many other saw packages. You won't find a printed manual inside the box. This is cost reduction to you. It's Greener and also allows you to get the most up to date information by viewing this online. The image below may not represent the actual model you have. We are working to correct that.
Splitters
Lets start with the splitters. This is the heart of this guard system and will be used most often. Installation is the same for either left or right tilting arbors. I suggest you apply some Johnson's Paste wax or Minwax Paste wax to the Splitters. This should be done periodically to clean and protect the splitters and to slick up the surfaces to reduce friction.
DISCONNECT THE POWER SOURCE. NEVER COUNT ON YOUR SWITCH ALONE TO CONTROL THE POWER WHEN WORKING ON MACHINERY. THEY CAN FAIL.
Currently, these splitters are designed to mount very much like the front portion of your OEM blade guard. It utilizes the mounting bolt and splitter boss inside the throat plate and behind the saw blade away from the operator. Remove your throat plate. It may also be easier initially to remove the saw blade as well. This would be a good time to clean out the inside of your saw.
Remove any splitter that you have mounted now, by removing the mounting bolt and washer. If you have the original washer, this will be used under the new orange or black ratcheting handle that came with the shark package.
The tallest splitter is for use with the thickest stock. These were designed to utilize the full blade depth with the Shark Guard in place. The medium splitter is for use on regular cutting such as sheet goods, 1 by and 2 by material.
There are now warning labels on all SGK1 shark guards that serve to help as a reminder to do this for you and others who may use the saw.
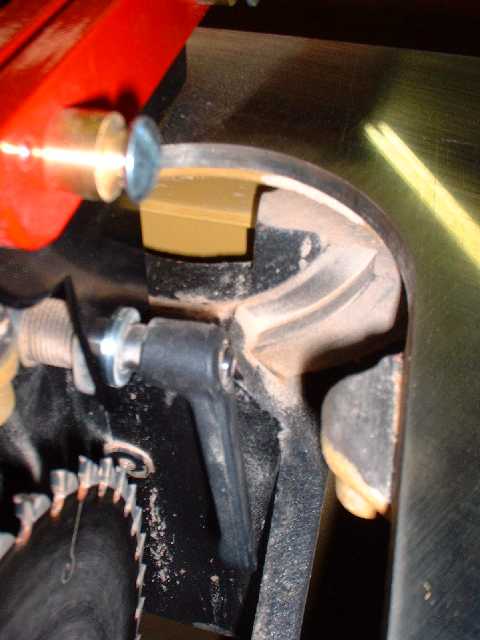
Now you need to install this adjustable ratchet handle. It has a threaded stud on it. Use your large washer, then the handle. Start threading the handle into the boss mounting hole. This handle works by turning, pulling out, repositioning the handle and turning more. It is spring loaded and will snap back into gear without any outward pressure. It is kind of tricky to install the first time, but won't need to be removed. Only loosened in the future. A hex key (allen wrench) may be useful to hold the stud in position while repositioning the handle. Don't tighten this up completely.
Slip the bottom portion of the splitter behind the large washer and onto the stud. You may notice that this splitter is a fair fit on the mounting bracket. This helps to insure that the splitter will stay where it should and not be able to tilt forward or backward. You can now tighten up the handle on the splitter. The handle should be at 3 to 5 o'clock position for right tilts and 7 to 9 for left tilts when tight. You may need to modify aftermarket throat plates for clearance of this handle when bevel cutting. See last image in the layout below.


Splitter Alignment
At this point of setup you will need to align or verify alignment of the splitter to the blade. Install your blade if you have removed it earlier. You will need to use a straight edge, steel ruler, framing square or something similar. Alignment can be accomplished a few different ways. There are a couple of splitter mounting bracket alignment bolts on the Unisaws and most other saws. Refer to your Operator's Manual.
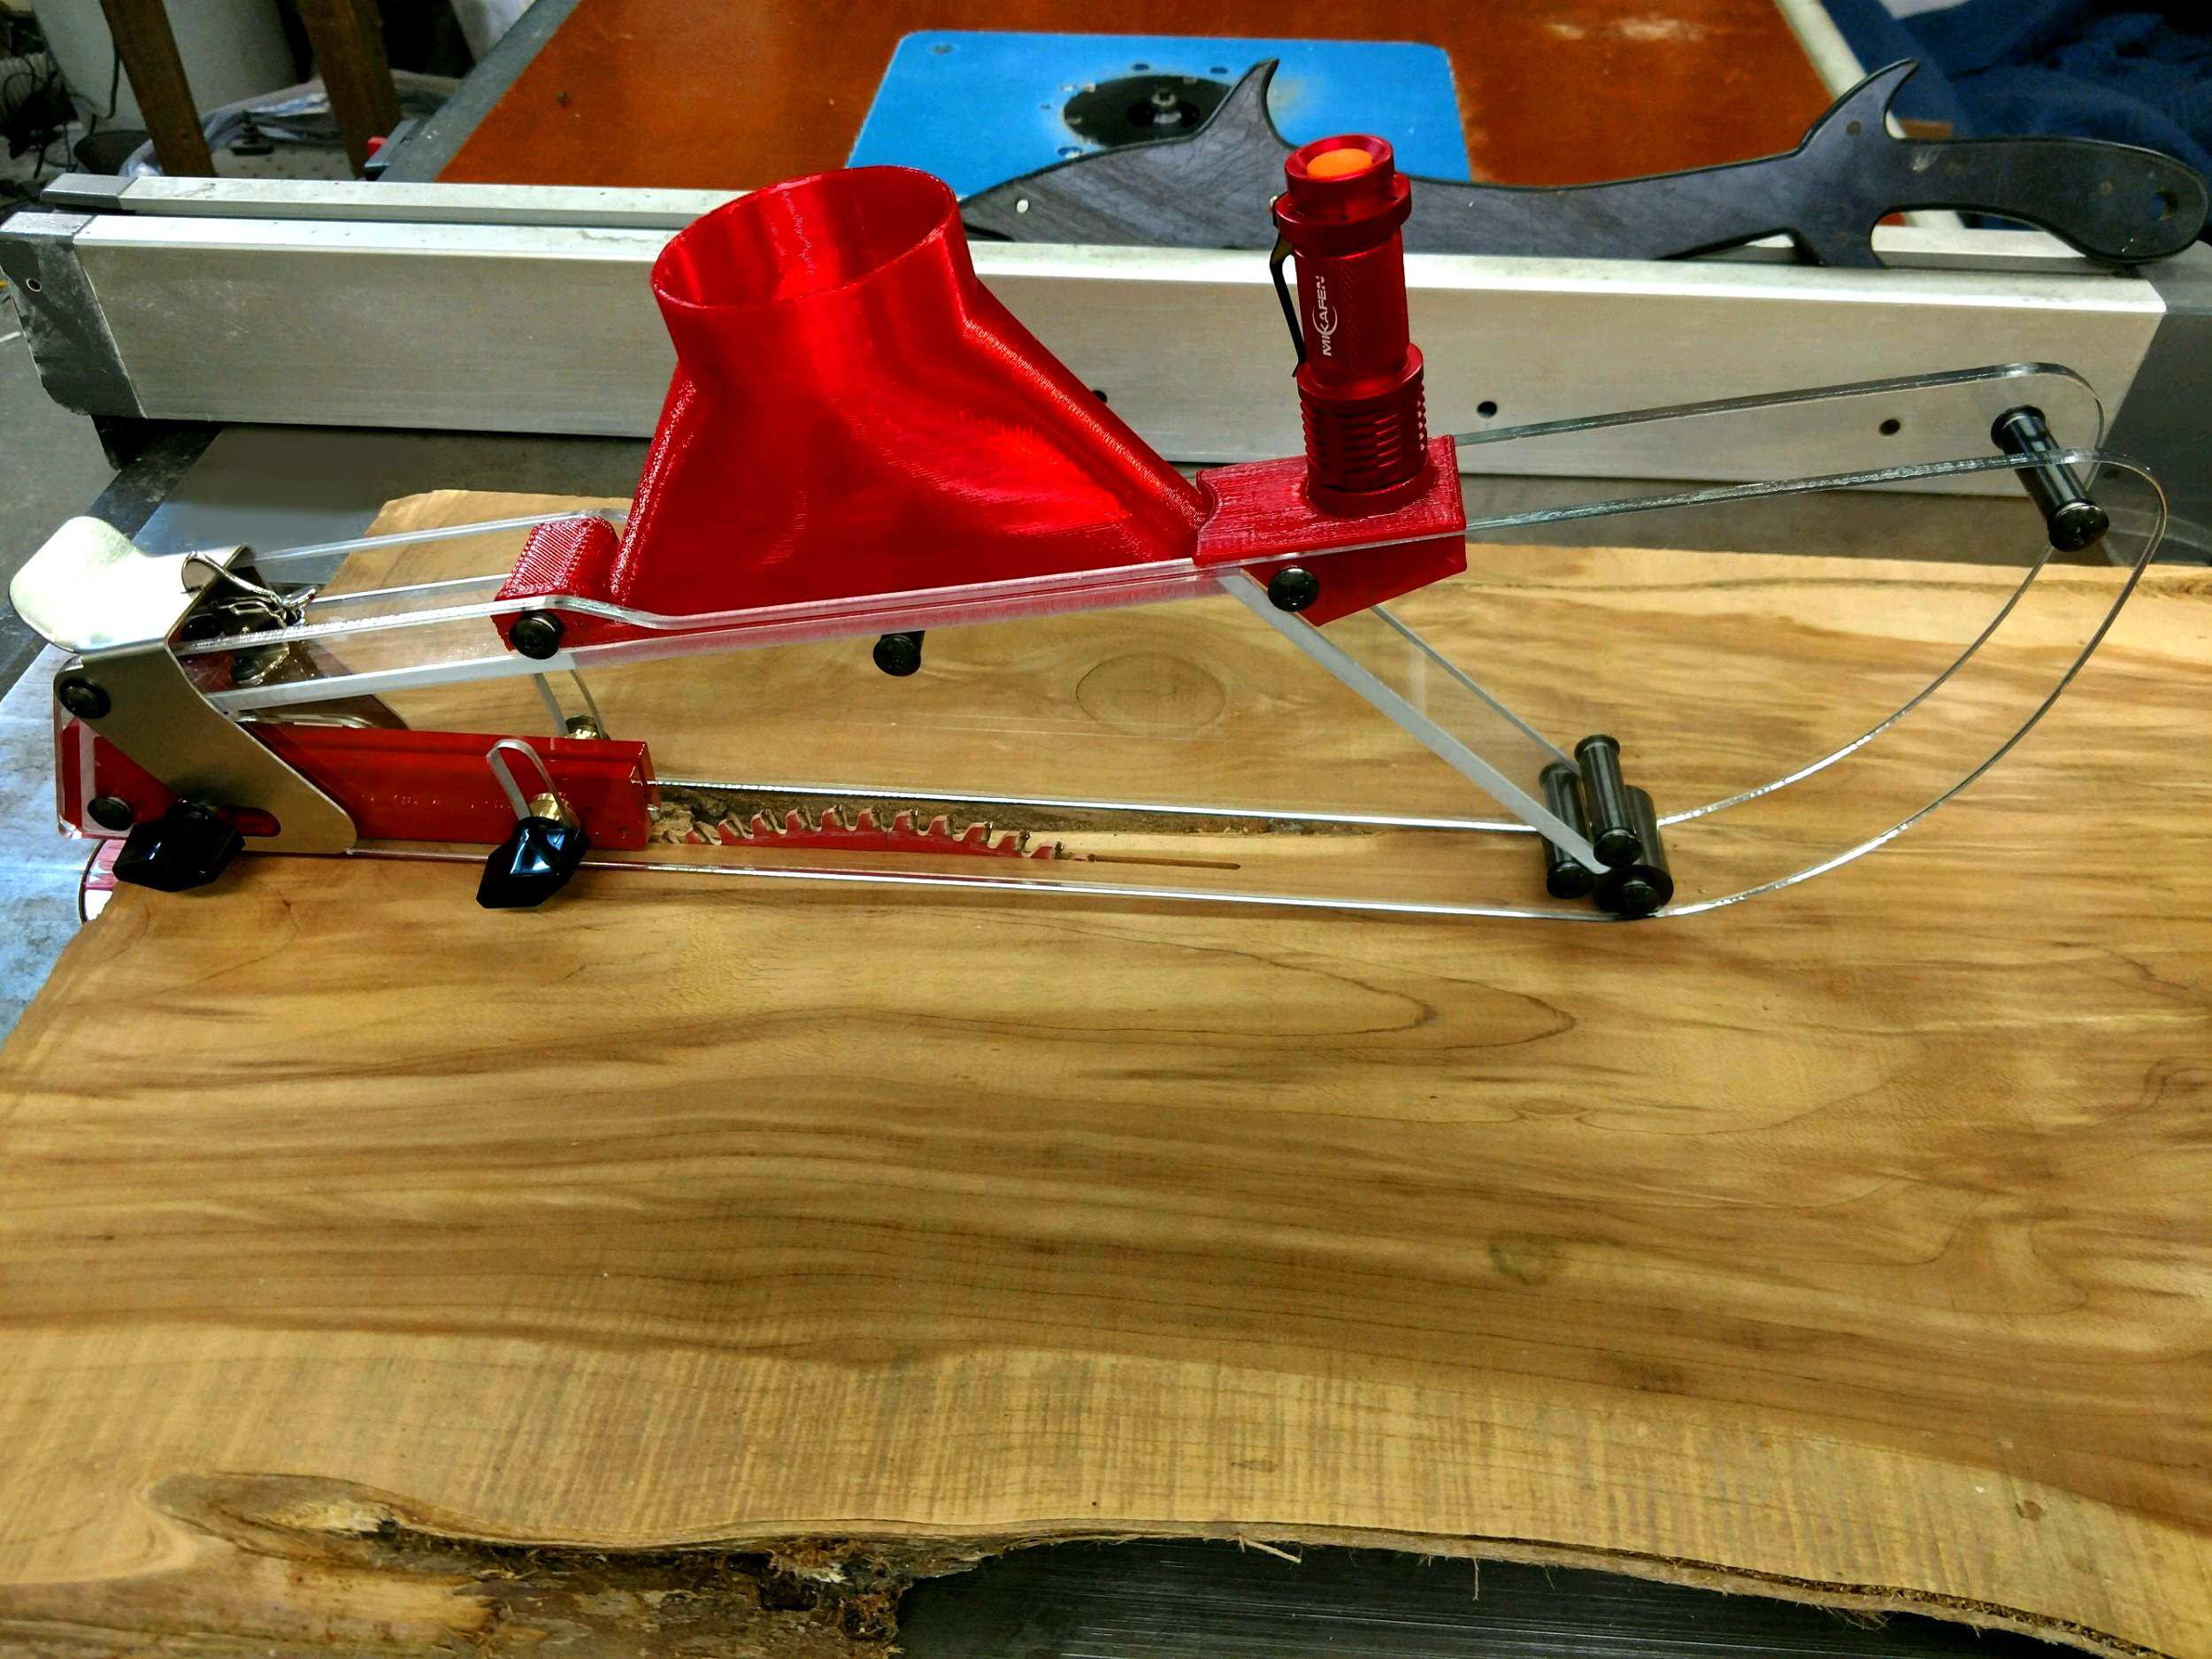
Once you have the splitter securely installed and aligned, you can install your throat plate. Install this according to you Operator's manual. The three slots on the top of the two largest splitters are used with this clamp. The three steel pins in the lower portion of the clamp slip into these slots and lock down when the knobs of the clamp are tightened. There are also set screws in one clamp half that serve to keep the two clamp halves parallel when tightening regardless of splitter thickness. You loosen the knobs and slide the clamp toward the rear of the saw and lift up. Installation is the reverse. This clamp helps to prevent lifting of the material depending on material thickness being cut depending on stock thickness. Feeding the wrong thickness material can be dangerous. It can stop material in mid cut. Always check or adjust the guard height for material being cut. The pawls are spring loaded aids against kickback. On the Shark Guard they can be locked in the up position when not wanted for delicate materials or when cutting lots of narrow strips. Otherwise they would be in the down position and ride on the stock being cut. The Shark Guard has a horizontal hooked slot at the rear and a vertical slot forward. These slots are the mounting slots for this guard. The rear slots get hooked on the rear studs of the clamp. There is a safety hook that slips down over the rear stud to keep the guard from coming off when not intended. The newest version has a spring loaded latch design to keep the tail hooks locked in place.
Here is a link to some video's that help to show how these guard are intended to be used. Watch the videos that deal with splitters. This guarding system is designed to collect maximum dust during a cut, so the front roller underneath always rides on the stock. This helps prevent dust from getting slung forward by the blade on most cuts except at the very end of the cut and when cleaning up an edge. All guards with dust collection have trouble in those areas. If you ordered a guard with a dust port, a dust collection hose can be hooked up to the top of the guard using a hose clamp or just by slip fit. The dust port to hose connection is usually a snug fit. I suggest that something be done to the port though. If left open, you can get a fountain effect of sawdust right into your face. For a good fit with something that is readily available, spray paint tops will serve as a good cap for the 2.5 inch dust port. Larger ports might be capped using various plastic lids or tops. Rockler, Woodcraft and other outlets sell nice clear flex hose that fit these dust ports very well. If you leave the hose as a slip fit without a clamp, the hose can conveniently do duty on a router table as well. If you are installing a larger hose, you should also include a blast gate in line and easily accessible. This really is a requirement for 4 inch ports and is a good idea for smaller ones. When you will be cutting material that will have a small offcut, the suction from the dust port can be so powerful that it will lift the small parts and it can get thrown into the dust hose or into the front of the guard with extreme force. This is undesirable and easily prevented with a blast gate. There are numerous ways the you can support the hose for the dust collection. On my Gallery page, you will see some photo's of different setups. On my Review page, you will find links to individual websites where some owners used varied methods of supporting this hose. Here is a link with information on mounting the SGK1 overhead. For splitters and riving knives, I suggest paste wax like Johnson's or Minwax to both clean and smooth the surfaces for less friction. On the guards we like to use Windex and a soft cloth to periodically keep the guard clear. Dust can build up inside and out, so it provides the best visibility when clean. Replacement, spare or upgrade parts can be ordered using this link. If you don't find what you need there, then just send an email.
If you have any questions about installation, setup or usage of this blade guard or parts associated with it, please don't hesitate to contact us. We are happy to help insure your satisfaction and safe usage of these products. Thanks a bunch and I hope that you enjoy using your Shark Guard. The Clamp assembly
Anti-kickback Pawls
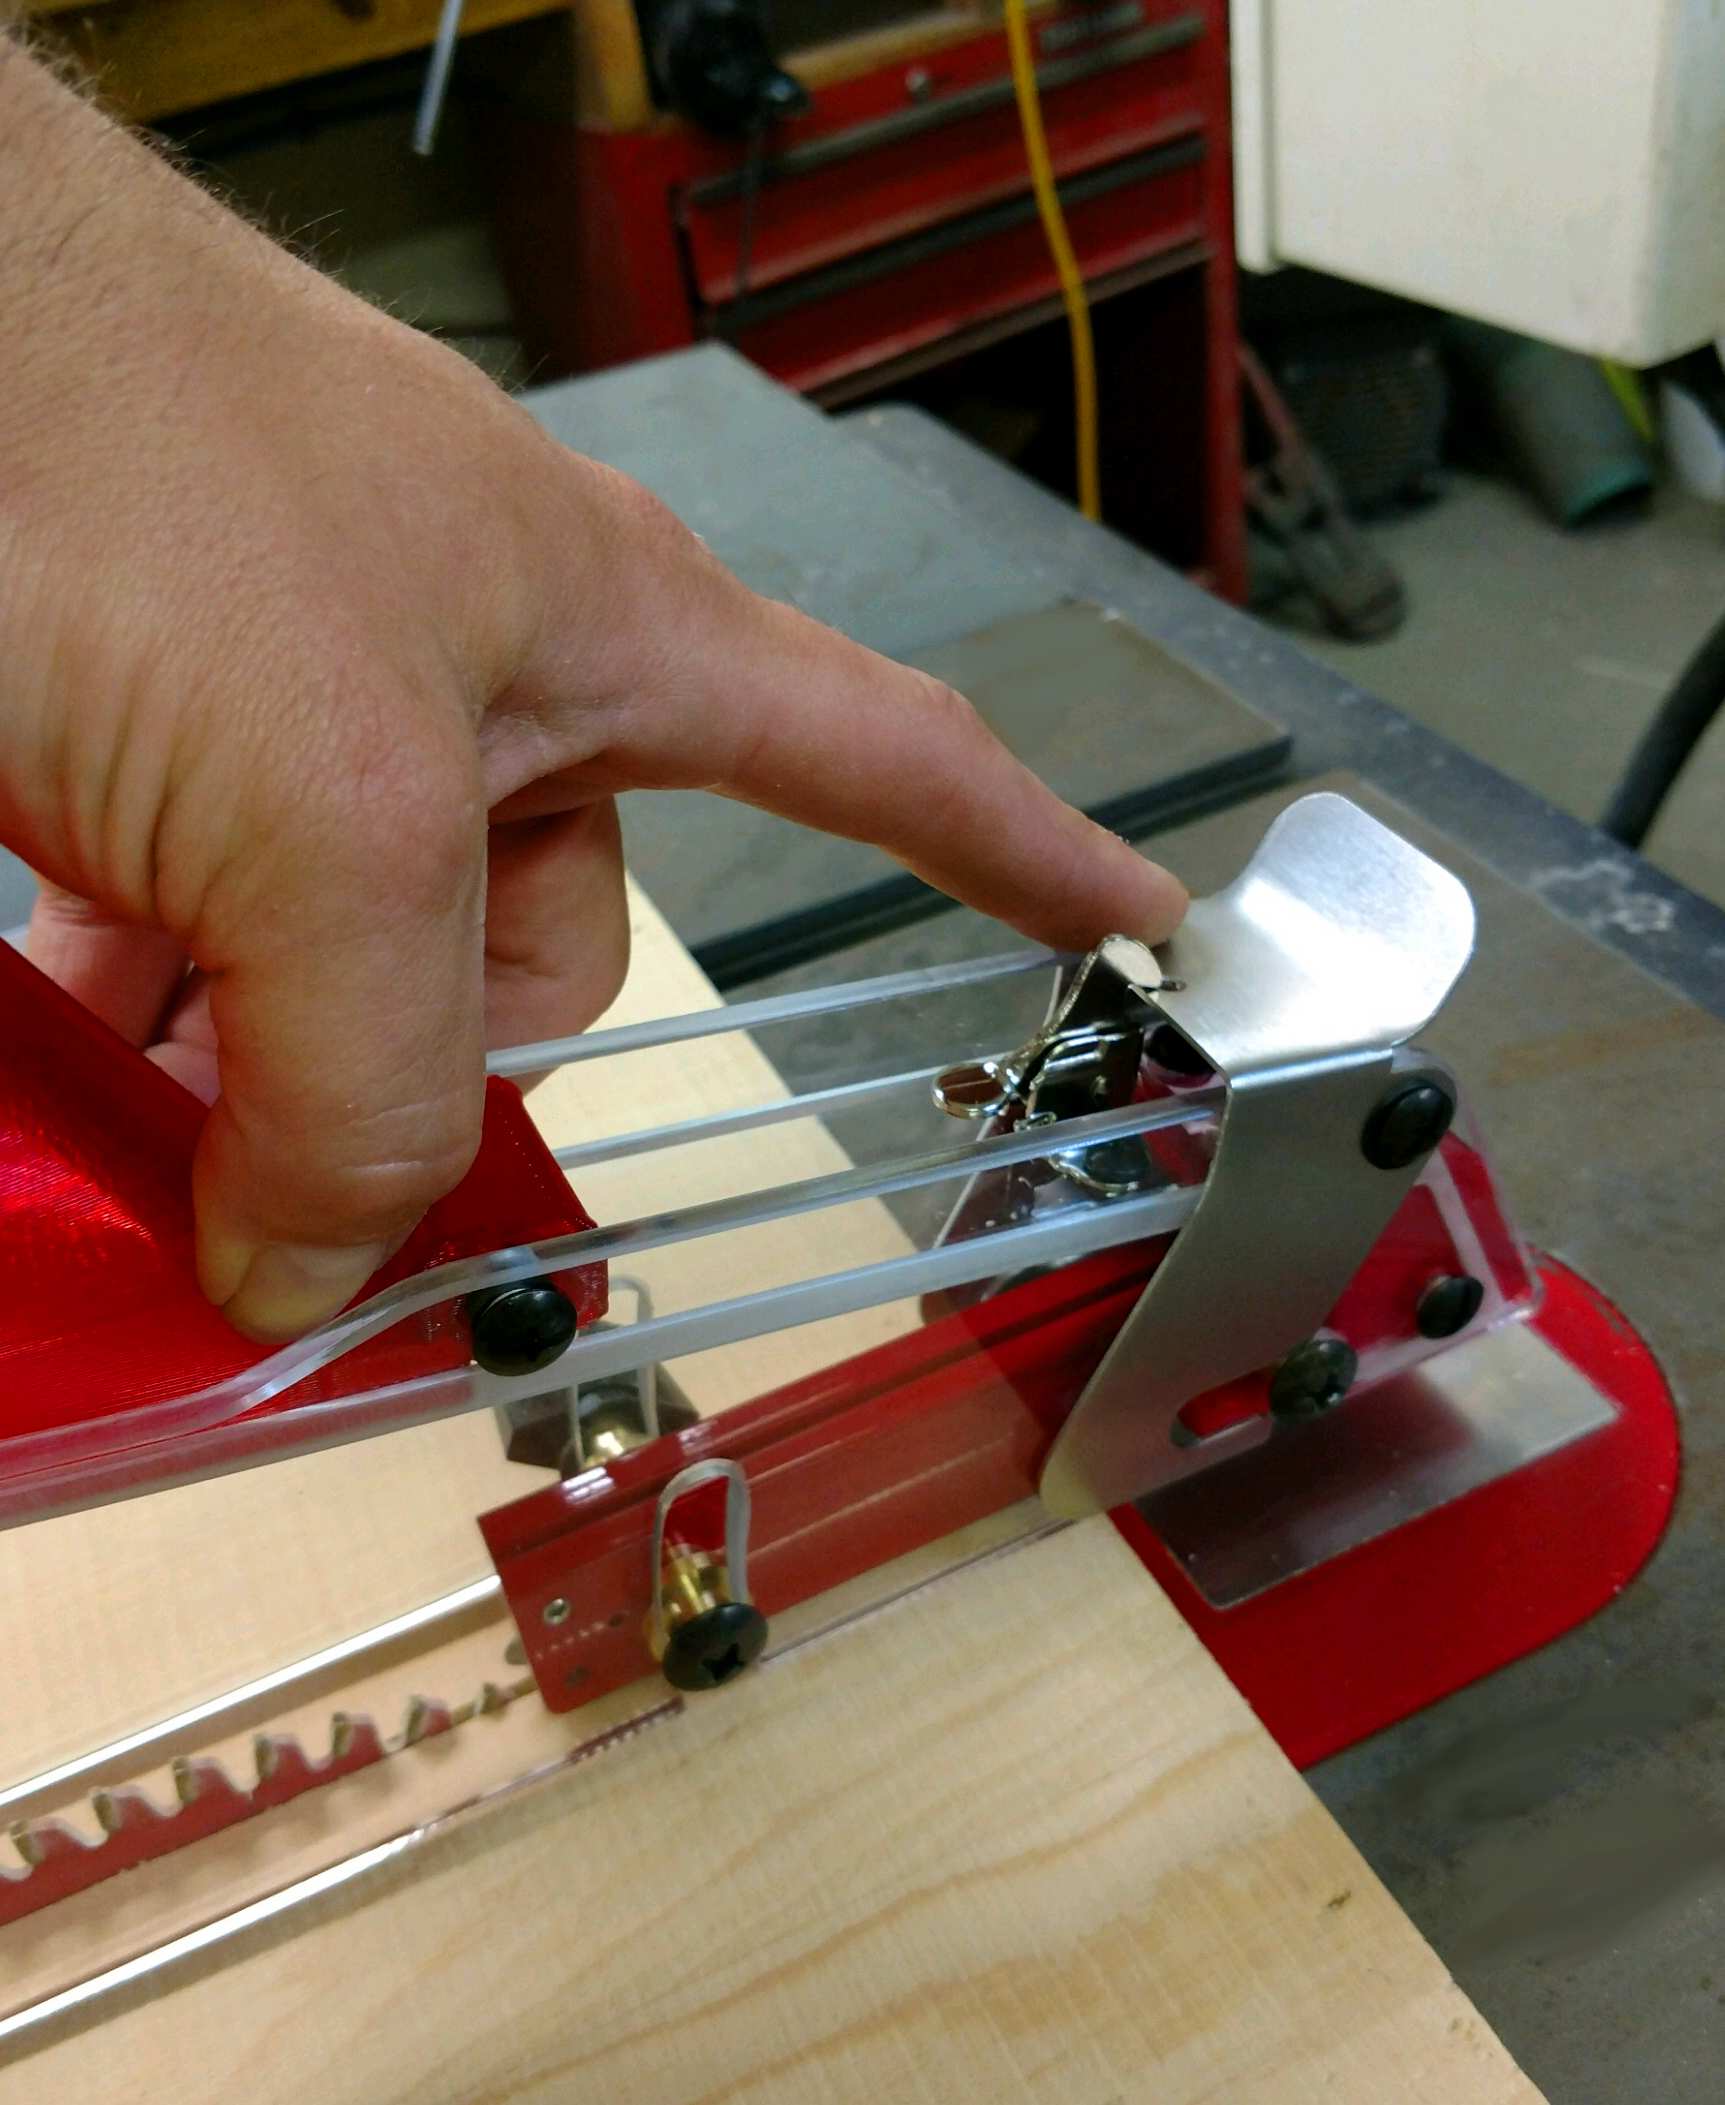
Using the tail hook
You can see in this images that the guard can be left in the upward position by hooking only the rear slot and resting the guard on the front stud and brass bushings. This ability is beneficial when measuring between the fence and blade with a steel rule. The front slots just slip down over the front studs with care taken to use the smaller bushing diameters. With this done and your tail hook swung down into place, your blade guard is installed.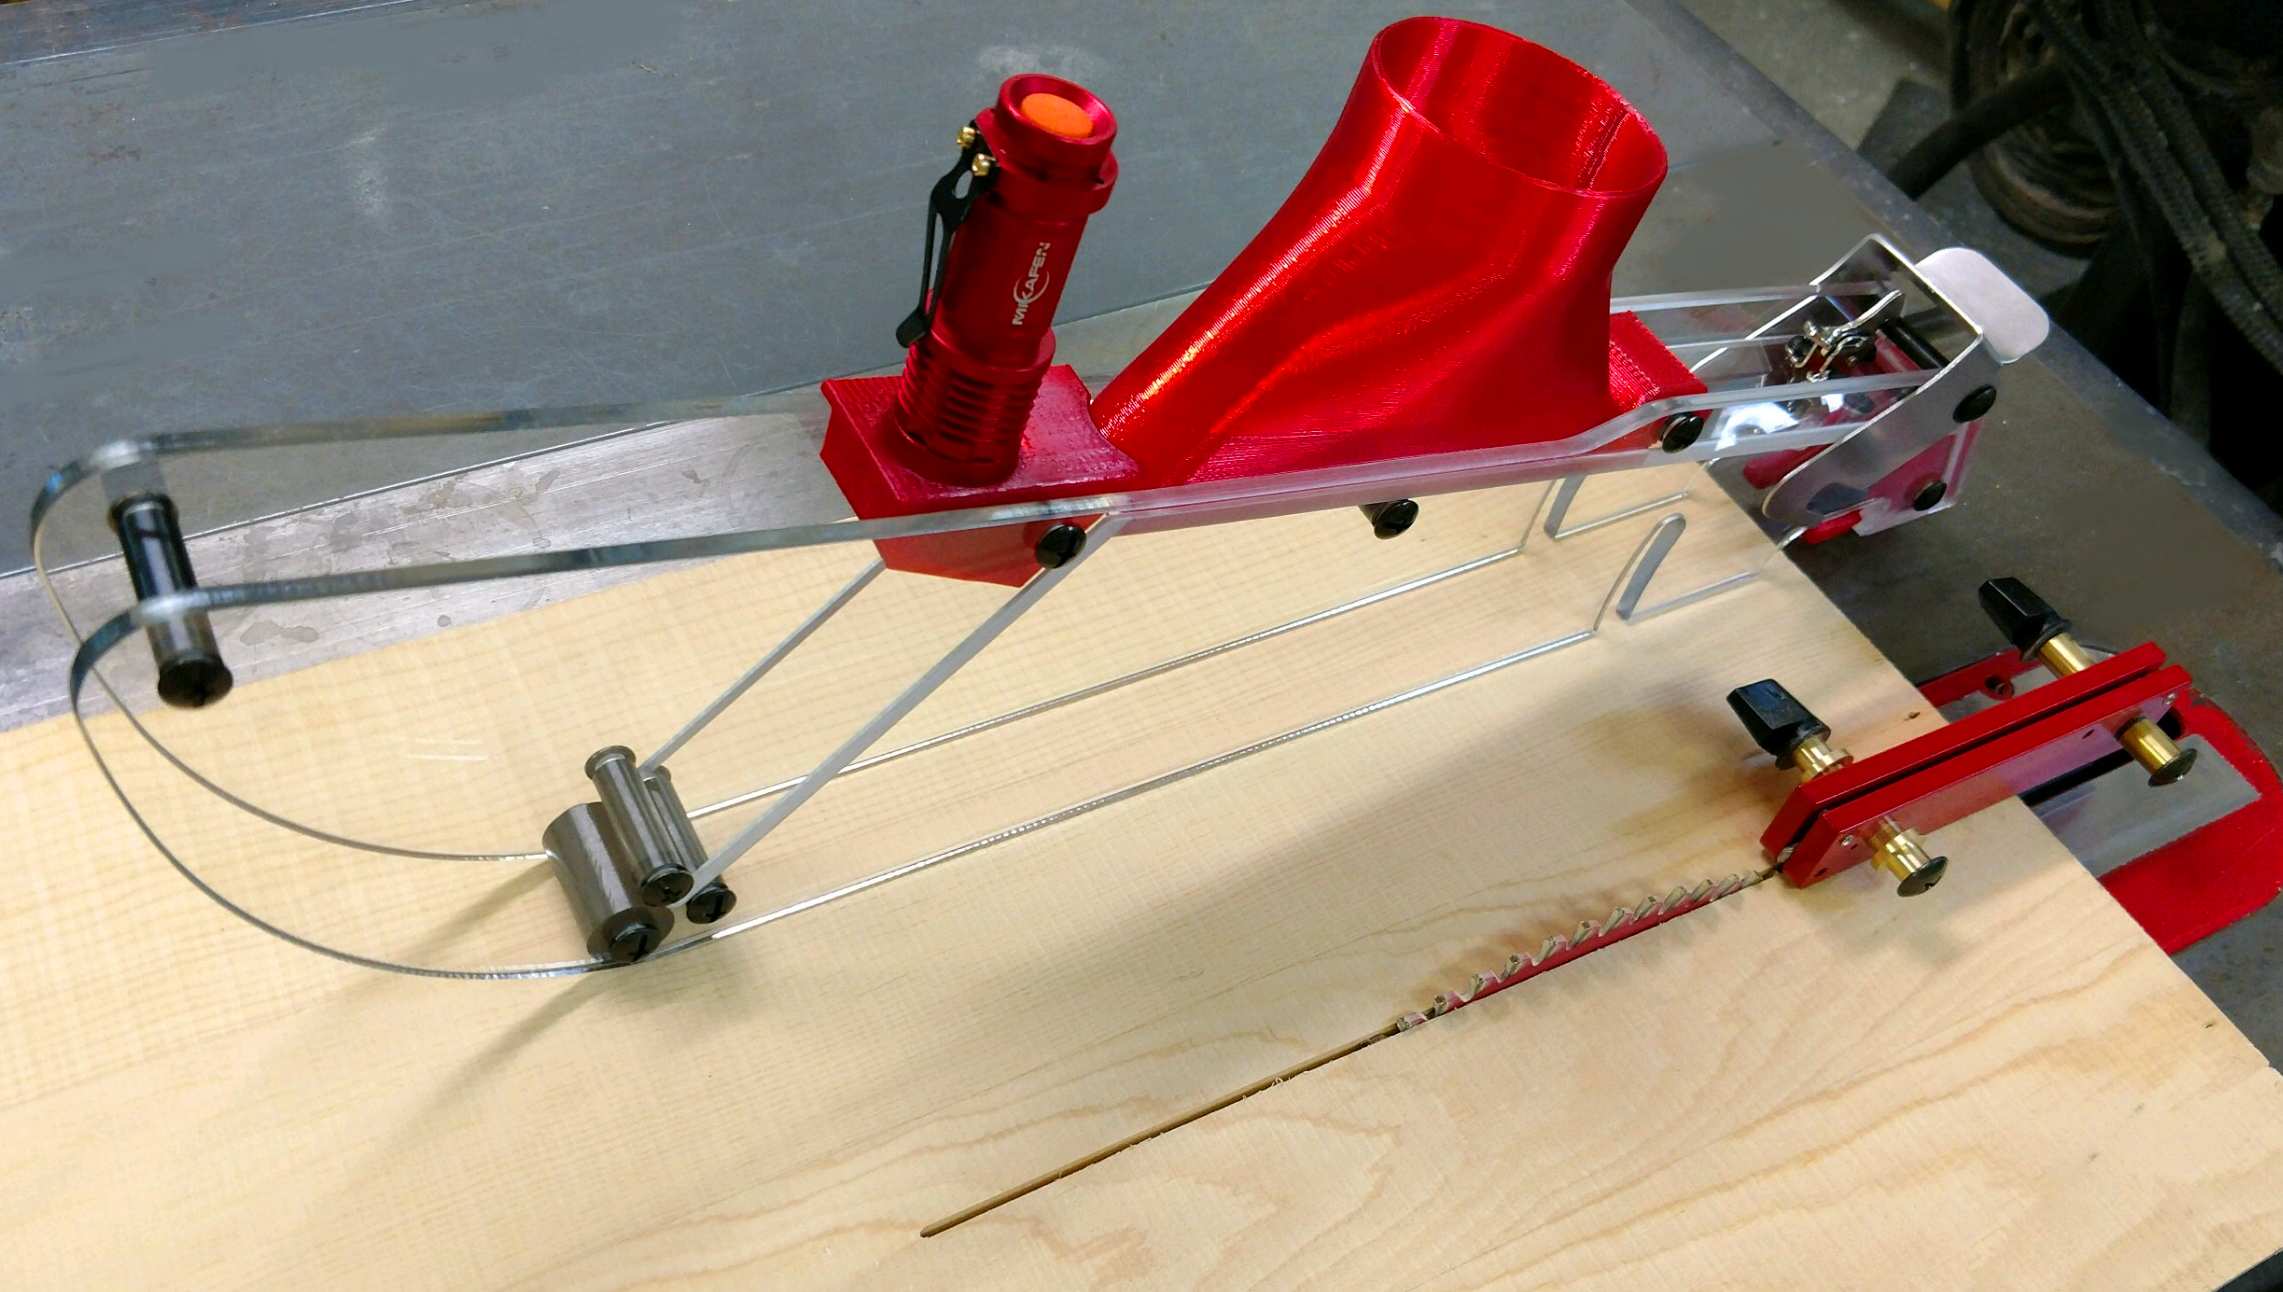
Using the Shark Guard
Dust collection installations
Care and cleaning of the Shark Guard
Replacement parts
Still have questions or concerns?